Smarter notifications – With the new Checkmk Notification Hub
 on May 6, 2025
Notifications are the heartbeat of effective monitoring. That’s why Checkmk gives you powerful options to control exactly who gets notified, when, and how — so you can react quickly when something goes wrong.
But as we learned in conversations with users, this flexibility can make configuration tricky at times. It hasn’t always been clear which settings to use for which purpose. That’s why, with Checkmk 2.4, we’ve completely redesigned our notification system. In this post, you’ll learn how you can now configure precisely the notifications you need — with just a few clicks.
Good news first: If you've already created notifications using the previous system, there’s nothing you need to do after upgrading to Checkmk 2.4. All your existing rules will continue to work. Everything functions just as before — only now it’s much easier to access and manage.
More clarity, better usability, fewer errors
Checkmk 2.4 introduces a revamped notification system that’s just as powerful as before — but far easier to use. The biggest improvements come in usability: better organization, direct access to key settings, sensible defaults based on best practices, and a more intuitive interface.
This leads to better reliability, a more streamlined experience, and fewer configuration errors — especially since we’ve removed many of the common pitfalls. In short: you get a tool that does exactly what you need, without the hassle.
The Notification Hub: Your central control panel
The heart of the new system is the Notification Hub — a single, central location where you can manage, configure, and fine-tune all things related to notifications. With the new interface, you can quickly create, test, and adjust notifications to fit your needs. Gone are the days of long lists, cryptic labels, and hidden dependencies.
Clearly named and logically grouped menu sections keep things organized. Collapsible panels make it easy to focus. Context-sensitive info boxes provide helpful guidance right where you need it. A new Guided Mode walks you through configuration step by step — making it much easier for new or occasional users to get started.

Spot and fix issues faster
The Hub's homepage gives you a compact overview of your notification status. For example, the new statistics feature shows the total number of notifications sent — and how many failed. Click on the "failed notifications" entry to jump straight to the affected messages and start troubleshooting.
Another time-saver: if notifications are accidentally disabled via Master Control, a new warning — “disabled by master control” — helps you spot and resolve the issue quickly.
Fine-tune with ease: Less noise, better targeting
The homepage also features two main panels that let you fine-tune your setup efficiently. Under "Optimize notifications", you'll find ways to cut down on unnecessary alerts. Use the "Balance short-term spikes" option to filter out temporary anomalies, or "Restrict generation of notifications" to manage alert volume overall.
The second column, "Supporting rules", lets you adjust escalation paths, contact groups, and timing dependencies with a single click. You’ll also see how often each rule is used — especially helpful when setting up new sites or cleaning up existing configurations.
The "Monitor/Check notification number for contact" view shows whether all intended users are receiving notifications — and whether anyone is getting too many or none at all. That way, you can make quick adjustments when needed.
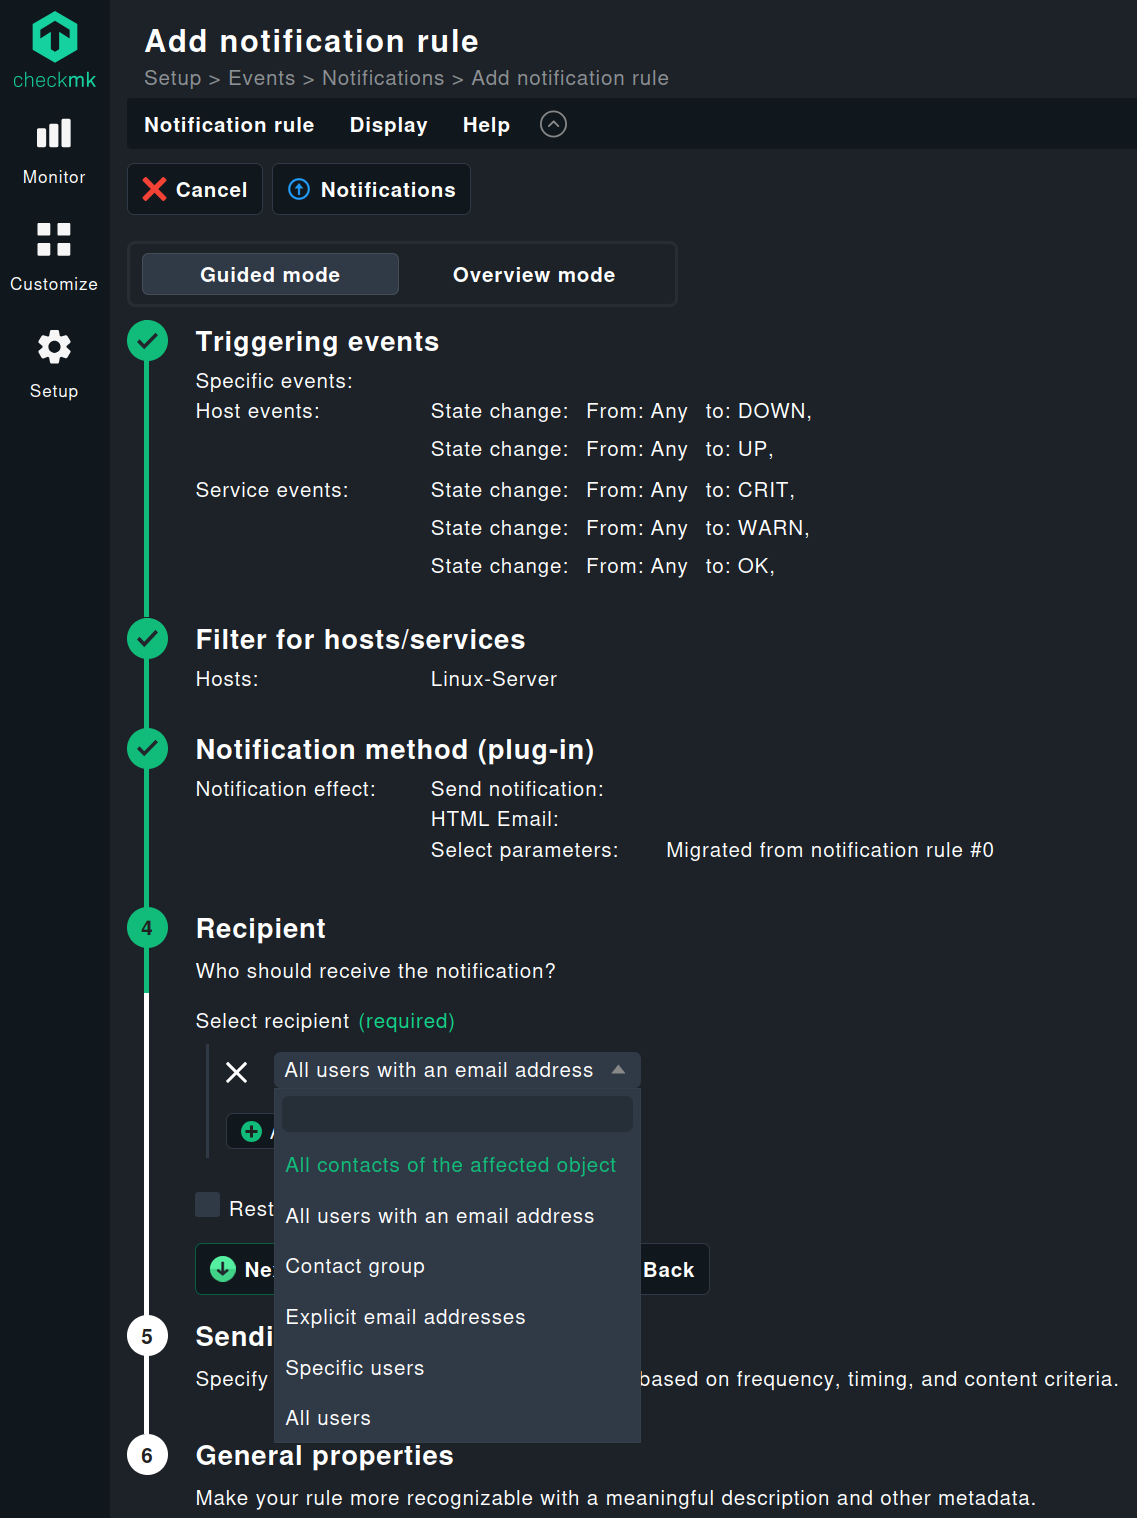
Two ways to create notifications: Guided vs. Overview Mode
When setting up new notifications, you can choose between two workflows — designed for different experience levels.
Overview Mode is built for experienced admins. Like before, you can configure everything at once and in any order.
Guided Mode leads you step-by-step through the process — perfect for newcomers or those who only occasionally touch notification settings.

Smart, step-by-step assistance
In Guided Mode, the interface only shows options relevant to the current step. It automatically validates your input and ensures only valid combinations can be selected. For example, when setting up a host-level notification rule, you’ll only see host-specific filters — not service filters.
You’ll also get immediate feedback if something is missing or incorrect. Validation happens after each step in Guided Mode, and at the end of the process in Overview Mode.
Best practices built in
We’ve baked in a number of community-sourced best practices as default settings. For instance, in the "What should trigger a notification?" step, Checkmk now only notifies by default when a host goes down or comes back up, or when a service enters or exits a problem state (Warning, Critical, OK).
State changes to “unreachable” or “unknown” no longer trigger notifications by default, as they’re typically only relevant for network or Checkmk admins. This helps new users avoid over-alerting while keeping the setup process simple. And of course, you can still modify these defaults — just click "Add event" and choose the triggers you need.
Clear settings, clear results
With more intuitive navigation, you’ll quickly find the settings you need. In the past, users sometimes mistakenly selected "match contact group" under Conditions thinking it defined who should be notified. In reality, that filter controls which hosts or services are assigned to a contact group — not the actual recipients.
Now, Checkmk makes a clear distinction between filters for hosts/services and the Recipient selection. Step 4 is where you explicitly define who gets notified — whether that’s individual users, contact groups, or specific email addresses. You can also add additional recipients using a dropdown menu.
Smarter notifications – With the new Checkmk Notification Hub
Setting up notification methods (Step 3) is now faster and more flexible. All available channels — like email, MS Teams, Slack, Jira, and more — are clearly listed. You can edit, clone, or delete parameters like subject lines, formatting, or connection settings directly from the list.
Thanks to new slideout panels, you can create or modify parameters on the fly — without ever leaving your current view.
Another improvement: parameters used across multiple rules — like an MS Teams integration — can now be managed centrally. Change it once, and the update applies everywhere. Just remember: parameters are pure settings — they don’t contain conditions.
Final polish: Conditions and controls
Sending conditions (Step 5) are now easier to use as well. These let you define things like frequency, time windows, or repeat behavior — so notifications don’t become annoying and escalation policies work smoothly.
You can easily configure things like “no notifications between 11 PM and 5 AM” or limit based on comments or plugin outputs — so only the right people get alerted.
Stay in control
The General Properties section now comes at the end of the configuration process — making it easier to add a meaningful description once everything is in place.
In Guided Mode, Checkmk will give you a summary of all your settings at the end. You can review everything before saving. Notification rules go live immediately — no need to click “Activate changes.”
Want to send a test alert? Click Apply & Test Notification to instantly send a test using all defined methods. You can also launch the test directly via the “Test notification” option in the Setup menu. When you’re ready to move on, click “Notifications” to return to the Hub homepage and create your next rule.